It's hard to believe we just finished the last weekend in September. I had a busy one.
One
On Saturday The Husband and I went and visited the Clueless Gardeners. Clueless - hah! - I don't think so. I forgot to take my camera so if you want to see pictures of their gardens you'll have to visit their blog. They have a nice piece of property on the edge of a wet woodland and are big on the natives. I like natives but I don't use them quite so extensively.
Michelle kindly passed along some native grasses. I got some Big Bluestem (Andropogon) and some Prairie Dropseed (Sporobolus). These blogalong plants will add to my native grass collection which contains mostly Panicum varieties. It was fun trying to communicate about the plants since I tend to know the scientific name (typical since I'm overeducated) and she knows the common names.
Michelle, I'll harvest those Asclepias seeds this week and drop them in the mail to you.
Two
This is the time of year when the local garden centers all have massive sales. They try to get rid of the stock so they don't have to keep it alive over the winter or pot it up into larger pots. There are lots of pot bound shrubs half off. It's taking a chance but if you're willing to take that chance you can get quite a deal. I picked up some nice Pieris, a male holly and a $5 gallon sized Amsonia. No pictures since by the time I got them into the ground it was very overcast and sprinkling.
I find that the "mud method" of planting really seems to increase success with pot bound plants. What is the mud method you ask? Let me put on my professor hat (a mortarboard, of course) and tell you.
First you pull the plant out of it's pot and put it in a bucket or bin that will hold water. Add water. Let it sit while digging the hole. This not only lets the plant take up a lot of water into the roots, making them less vulnerable to damage but it also loosens the soil around the roots. Then you need to get your hands in there and work the roots free of the soil as best you can. If you can get all the soil off ,great. I usually manage to get about half off. There should be at least some roots that are completely free of soil. Then into the hole it goes. But don't add back the soil just yet. Fill the hole with water and let it drain. Then I add soil to about the half way mark and fill the hole with water again. You see why this is called the mud method? When you've filled the hole in completely water well and you've created a very wet area of soil for the plant to get started in.
Of course then you are covered in mud so if you don't like getting dirty this method won't work so well.
[If you don't like getting dirty what are you doing gardening?]
C
Nooooooooooo
Lastly
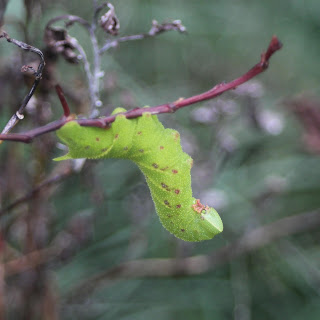
I found two of these caterpillars on my Ninebark this weekend. They are caterpillars of a Sphinx moth; I'm not sure which one. They are generally day active moths that hover at flowers, feeding on nectar. They can be mistaken for hummingbirds at first glance (The Sphinx moths include the Hummingbird moth.). I narrowed it down to three possibilities but they weren't on a host plant that was mentioned in my book so I'm really not sure which one they are. There are a surprising number of these caterpillars.
Fortunately they are NOT the tomato hornworm so I was able to let them be even though they are near the vegetable garden.
Whew. I'm tired just typing about all I did this weekend! And now I have to get to work. Work just interferes so much with gardening! Do you think my students would mind if I potted up my Ficus instead of grading their quiz? They would? Darn it!


Thanks for the lovely visit this weekend! Boy, I couldn't remember a darn thing when you were there. It's, you know, the plant. . . with the flowers. . . uuuh. . .
ReplyDeleteI am intrigued by your method of mudness. Don't tempt me to buy more plants, really! :D
Looking forward to more butterfly weed, wheee!
Bwa ha ha ha ha! I am a plant pusher. I will lead you into a life of grime!
ReplyDelete